The Domestic transfers screen displays the existing domestic remittances that you are enabled to view. The International transfers screen displays the existing international remittances that you are enabled to view. The SEPA transfers screen displays the existing SEPA remittances that you are enabled to view.
Depending on your needs, proceed as follows:
Select Payments > Remittances >SEPA transfers or click on the corresponding shortcut button in your dashboard
Select Payments > Remittances > International transfers or click on the corresponding shortcut button in your dashboard
If you have not created a debtor account in the Settings > General settings > Bank accounts menu, Iziago displays a creation window. Fill in the fields and click on Save.
If you have already registered a debtor account, click on + Create remittance. The Enter remittance information screen is displayed.
The + Create remittance template button enables you to create a remittance template. Note: If no existing remittance is displayed, the Enter remittance information screen is automatically displayed.
Select the appropriate remittance sub-type: Ordinary, Salary or Treasury.
Select the owner of the debtor account as well as the debtor account. Depending on the payment settings saved for the selected account, the other fields are automatically filled.
Modify or complete the desired remittance information. Reminder: Click on the buttons at the right hand corner of a section to expand or collapse it.
If necessary, check and modify the remittance execution date. Note: If the execution date of a remittance is in the past, the remittance cannot be sent.
Click on Save. The Edit remittance information screen is displayed. It enables you to:
Create immediately a new remittance. To do so, click on + Create remittance at the top of the screen.
Prerequisite: You must create creditors in the Third-party database module and have the Use right on the groups to which the creditors of the transfers belong.
Ensure that the appropriate remittance is displayed in the Edit remittance information screen. Otherwise, proceed as follows:
Depending on the type of the remittance:
Select Payments > Remittances >SEPA transfers or click on the corresponding shortcut button in your dashboard
Select Payments > Remittances > International transfers or click on the corresponding shortcut button in your dashboard
Enter the appropriate fields, then click on Display. A result table is displayed.
Click on the remittance in the table to display it in the Edit remittance information screen.
Click on + New transfer above the table in the Transfers section. The fields in the table can be entered.
In the Creditor column, select the transfer creditor (a search function is available). To create a new creditor, click on + Add new third party. Notes: For domestic transfers, you can only select the creditors who are already defined in the third-party database and whose account is domiciled in the same country as the debtor account. For SEPA transfers, you can only select the creditors who are already defined in the third-party database and whose account is domiciled in the SEPA zone. For international transfers, you can select all the creditors who are already defined in the third-party database.
The account linked to the selected creditor is automatically entered in the Creditor account column. If the creditor has several accounts, select the desired account. Tip: If you have added several creditors to your payment remittance, you can sort them alphabetically by clicking on .
Enter the motive of the transfer. Tip: You can apply the same motive for all transfers of the same remittance by clicking on . The Apply common motive window is displayed. In the Motive field, enter the motive that will be applied to all transfers and click on Apply.
Enter the amount of the transfer. Note: If you wish to define the transfer amount later, you can enter 0 or leave the field empty (in this case, when saving the transfer, the amount will automatically be 0). The transfers with 0 must be deleted or modified in order to be sent to the bank.
The Currency column displays EUR if it is a SEPA transfer. If it is a domestic transfer, the creditor account currency is displayed. If it is an international transfer, the currency displayed is the one of the country entered in the Bank country field when creating the third-party and their account. Note: You can modify the currency of International transfers. You cannot modify the displayed currency for SEPA and domestic transfers.
You can enter the Transaction code and Budgetary code of the transfer according to the batch booking of the remittance (Additional fields section):
If you have chosen “One debit for each transfer” as batch booking in the Additional fields section, the Transaction code and Budgetary code columns are displayed in the transfer table.
If you have chosen "One debit for all transfers" as batch booking in the Additional fields section, the Transaction code and Budgetary code fields are displayed at the bottom of the screen in the Forecast transaction information section.
If you wish, you can complete the additional fields by expanding the section(s) at the bottom of the screen. Reminder: Click on the buttons at the right hand corner of a section to expand or collapse it.
If you wish, you can add another transfer in this remittance. To do so, click again on + New transfer above the table.
To save the transfer, click on Save. Note: The end-to-end reference for each transfer is generated automatically. If you wish, you can enter it manually in the edit form.
Adding transfers in a remittance by importing a text file with separator
A text file with separator must contain the data of the orders to be imported in Iziago. If you have entered an internal identifier for third parties registered in your database, you can import files containing only the internal identifier of the third party and the amount of the order. Iziago will automatically retrieve the information of the third party (name, account number, etc.) from your database. If you have not entered an internal identifier for the third party in your database, the imported file must contain at least the name and account number of the third party.
Make sure that there is one order per line in the file and the file has no empty line.
Make sure that the appropriate remittance is displayed in the Edit remittance information screen. If it is not the case:
Proceed as follows:
Select Payments > Remittances >SEPA transfers or click on the corresponding shortcut button in your dashboard
Select Payments > Remittances > International transfers or click on the corresponding shortcut button in your dashboard
Enter the name of the format if this is your first importation format.
In the File format parameters section:
Indicate if your file contains a header.
Indicate the used field delimiter.
Indicate if your file contains a text qualifier. Otherwise, select Other.
Select the Force amounts to zero option if you wish that every imported transfer with this format has zero as amount in Iziago, regardless of the amount in the file.
If the Currency of transfer field is not defined in your file, select the currency to be defined by default for the imported international transfers. Note: For SEPA transfers, the currency is always Euro. For domestic transfers, the currency is the currency of the account to be debited.
To give the same motive to every imported transfer, define the Motive field. If the Motive is indicated in your file, do not enter this field.
Imported third parties that are not yet registered in the third party database will automatically be registered there. Specify in which group the third parties will be registered and whether they should be registered as Company or Person.
Click on View before import.
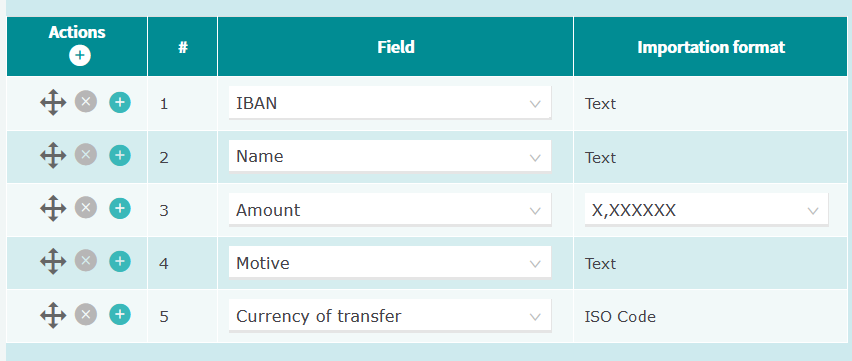
In the File structure section:
Select the fields of Iziago that correspond to the columns of your file.
Select the importation format of each field (when required).
Arrange the lines so that they match the order of the columns of your file:
Click on to delete a line.
Click on to add a line.
Drag and drop the icon to arrange the lines in the order of your choice.
Click on Import. The importation format is automatically saved. Once the importation completed, Iziago displays a report detailing the number of successful, failed and ignored transactions. You can export the report in PDF format by clicking on .
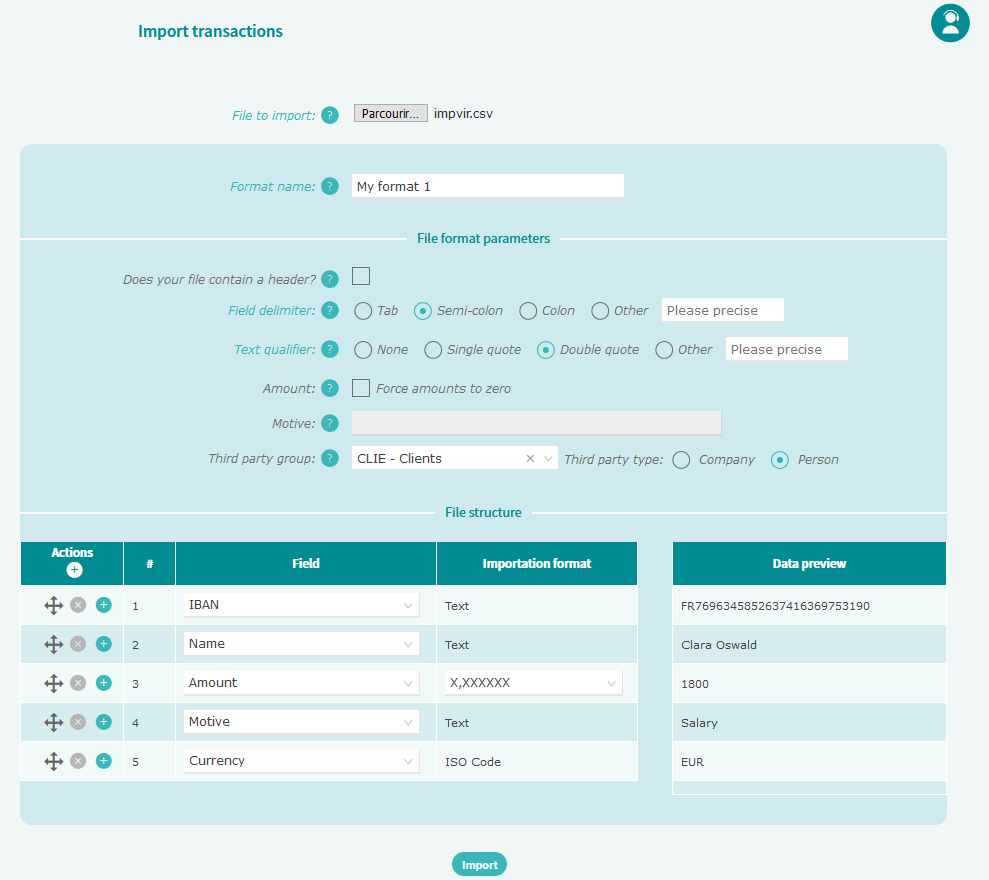
Example: Here is the content of a .csv file used to import 2 transfers:
Here are the settings used to import this .csv file.
Click to enlarge
Managing importation formats
What is an importation format?
An importation format is a set of importation settings (field delimiter, text qualifier, file structure, etc.). Using an importation format makes you save time when importing transfers. As a good practice, we advise you to save frequently used settings as importation formats.
Prerequisite: To create, edit or delete an importation format, you must have a file with a separator containing transfers to import into Iziago.
Enter the appropriate fields, then click on Display. A result table is displayed.
Click on the remittance in the table to display its information in the Edit remittance information screen.
In the Edit remittance information screen, click on + Import transfers. The Import transactions screen is displayed.
Click in the File to import field and select the file you wish to import. New fields are displayed.
In the Format field, click on + New. The Add new format screen is displayed.
Define the format settings of your file:
Format name
Use the checkbox to indicate if the text file with separator contains headers.
Field delimiter: Indicate which character determines the end of a field and the beginning of the next one.
Text qualifier: If each field is surrounded by a character to be ignored during the importation, indicate what is this character. Example: In order to import correctly the following transfer, the double quote must be defined as text qualifier.
Select the Force amount to zero option if you wish that every imported transfer with this format has zero as amount in Iziago, whatever the amount defined in the file.
Select the currency to be defined by default for the imported international transfers. Note: For SEPA transfers, the currency is always Euro. For domestic transfers, the currency is the same as the debtor account currency.
To give the same motive to every imported transfer, define the Motive field.
Select the Create third parties option to import transfers for third parties that do not exist in the database. In this case, determine their group and their type. If you do not select the option, you can import transfers only for the third parties existing in the database.
Indicate the parameters of the file structure, that is the information contained in the text file with separator and in which order the information is presented. This enables the information to be mapped into Iziago fields. Use the buttons in the Actions columns to add/remove lines in the table or change their order. Example: Click to enlarge
The Importation history screen is made of a search panel at the top of the screen, and a result table which is displayed only if there exists at least one report which corresponds to the search criteria; otherwise, the message “No existing report” is displayed.
Make sure that the appropriate remittance is displayed in the Edit remittance information screen. If it is not the case:
Proceed as follows:
Select Payments > Remittances >SEPA transfers or click on the corresponding shortcut button in your dashboard
Select Payments > Remittances > International transfers or click on the corresponding shortcut button in your dashboard
Enter the appropriate fields, then click on Display. A result table is displayed.
Click on the remittance in the table to display its information in the Edit remittance information screen.
In the Edit remittance information screen, click on + Import transfers. The Import transactions screen is displayed.
Click on Importation history at the top of the screen.
Select the desired year and month in the search panel.
In the result table, you can see the following information regarding the listed reports: Importation date, user that imported the file, file name, number of transfers contained in the file, importation duration, number of transfers successfully imported, number of transfers whose importation has failed, and number of ignored lines (empty lines for example are ignored).
If you wish, you may:
Export as PDF the information of a report. To do so, click on on the appropriate line.
Click on a line to display the report into the Importation report screen. Note: The Importation report screen is also automatically displayed after each importation.
Displaying the information of a domestic, international or SEPA transfer remittance
By default, the table displays all the existing remittances that you have the right to display. Depending on the menu that you have selected, the displayed remittances contain domestic, international or SEPA transfers.
Depending on your needs:
Select Payments > Remittances >SEPA transfers or click on the corresponding shortcut button in your dashboard
Select Payments > Remittances > International transfers or click on the corresponding shortcut button in your dashboard
To find a remittance in the table easily, you can:
Filter the table by entering the appropriate fields in the search section.
Change a column sorting order by clicking on its header.
Perform a search. To do so:
Click on Search. The search form is displayed.
Enter the appropriate fields, then click on Display. A result table is displayed.
To display the detail of a remittance, click on it in the table. The remittance transfers (if there are any) are displayed in a table, in the Transfers section in the center of the screen.
Tip:
When you view the detail of a remittance, you can switch quickly from a remittance to another one by using the Remittance drop-down list or by clicking on .
When you view the detail of a transfer, you can switch quickly from a transfer to another one by using the Transfer drop-down list or by clicking on .
Sending a transfer remittance by downloading it
This procedure enables you to download a remittance of domestic, international or SEPA transfers as a .xml file. You can then send the file to your bank by your own means.
The standard (SEPA or ISO 20022), the format (for example pain.001.001.003) and the .xml file name depend on the payment settings.
Enter the appropriate fields, then click on Display. A result table is displayed.
In the table, click on the remittance to be downloaded. The remittance is displayed in the Edit remittance information screen.
Click on Download at the top or at the bottom of the screen. Note: A warning message appears if you download a remittance containing the same information as a sent remittance (debtor, bank account, execution date, amount, etc.). You can either cancel or confirm the download.
If you have not registered your bank's website address, a window is displayed. We advise you to fill in with the address of your bank's website, this will enable you to be redirected to this website once your remittance has been downloaded. Enter the address and click on Save. If you do not wish to enter your bank's website address, click on Ignore.
The authentication window is displayed. Enter the 4-digit code on your authentication card corresponding to requested box, then click on Confirm.
The remittance is downloaded to your desktop and then considered, for Iziago, as sent to the bank.
A window is displayed. You can :
Print a confirmation,
Send the transaction notifications,
Copy the remittance into a template.
Do not forget to send the downloaded remittance to your bank by your own means.
Note: If you have entered your bank's website address, Iziago opens the page of the entered website in a new tab so that you can import the downloaded file quickly.
Generating a forecast transaction after sending a remittance
This procedure enables you to set up the generation of one or more forecast transactions when a transfer remittance is sent by download.
You must have subscribed to the Cash forecasting module.
You must have activated the debtor account(s) in the Cash forecasting module.
Once you have downloaded your transfer remittance, Iziago generates one or more forecast transactions, depending on the Batch booking (Additional fields section of the remittance) you have chosen:
If it is a domestic or SEPA transfer remittance and you have chosen "One debit for all transfers" as the Batch booking, Iziago will generate a single forecast transaction for the whole remittance.
If it is an international transfer remittance and you have chosen "One debit for all transfers" as the Batch booking, Iziago will generate a forecast transaction per currency contained in the remittance.
If you have chosen "One debit for each transfer" as the Batch booking, Iziago will generate a forecast transaction for each transfer contained in the remittance.
If you have sent a treausury transfer remmitance, Iziago will generate a forecast transaction for the debtor account and a forecast transaction for the selected creditor account.
Editing a domestic, international or SEPA transfer remittance
Enter the appropriate fields, then click on Display. A result table is displayed.
Click on the desired remittance in the table. The remittance is displayed in the Edit remittance information screen.
Perform one of the following actions in the transfer table:
Enter or modify the necessary information of the transfer, then click on Save.
On the line of the transfer to be edited:
Click on . The transfer is displayed in the Edit transfer screen.
Enter or modify the necessary information of the transfer. Note: By default, the end-to-end reference is generated automatically. You can enter it manually in this screen. Reminder: Click on the buttons at the right hand corner of a section to expand or collapse it.
Click on Save.
Deleting a domestic, international or SEPA transfer remittance
Enter the appropriate fields, then click on Display. A result table is displayed.
Click on the desired remittance in the table. The remittance is displayed in the Edit remittance information screen.
You can view the transfers of a remittance in the table of the "Transfers" section, in the center of the Edit remittance information screen.
Perform one of the following actions in the transfer table:
Click on on the line of the transfer to be deleted. Click on Save to save your deletion.
Click on on the line of the transfer to be deleted. In the Edit transfer screen, click on Delete to delete this transfer. In the confirmation window, click on Delete.