The Cash forecasting > Daily treasury > Forecast management > Search and modify transactions menu enables you to search for forecast transactions and operations from your bank statements that you added to your Iziago environment. Once displayed, you can delete or modify transactions.
Account: Select the account you wish to display. If you wish to add more accounts, click on + to reopen the list and add an account. You can also select a group of accounts, if you have any. To do so, select the group of your choice, which automatically includes all its accounts. You can unselect an account by clicking on it. This action doesn't remove the account from the group permanently.
Transaction code: Select the transaction code to display. If you wish to add another code, click on + to reopen the list and add a code. You can also select a group of codes, if you have any. To do so, select the group of your choice, which automatically includes all the codes belonging to the group. Note: If you select Undefined, Iziago will display the forecasts whose transaction code has not been defined.
Budgetary code: Select the budgetary code to display. If you wish to add another code, click on + to reopen the list and add a code. Note: If you select Undefined, Iziago will display the forecasts whose budgetary code has not been defined.
Booking date: Date on which the entry was posted to the bank account.
Value date: Date on which the asset becomes available (credit entry) or unavailable (debit entry).
Amount: Enter a minimum and maximum forecast amount. You can search by amount or by original amount (amount before conversion).
Currency: Specify the currency of the forecast you are looking for. If you wish to add other currencies, reopen the list again and select a currency. Note: You can only select the currency used in your forecasts.
Description: Enter a key word, and select a filter in the drop-down list (Is - Is not - Contains - Does not contain).
References: Specify the references (Remittance motive, cheque number, etc.) for the forecast you are looking for. Click on to enter additional references.
Transaction type: Select whether you are looking for realized transactions and/or forecasts.
Click on Search. The corresponding forecasts are displayed in a table. The icon in the Type column identifies the recurring forecasts.
To change the display of the table content, click Content Manager above the table. For more information about the content manager, refer to Tables.
You can:
Export the table in Excel format by clicking on .
Modify the information directly in the table.
Click on the line of the forecast whose data you wish to change. The forecast is displayed in the Edit forecast transaction screen. Change the desired information and click on Save.
If you are modifying a recurring forecast, specify in the displayed window whether you wish to change this forecast and all subsequent ones or just this forecast.
Modifying several transactions at once
To apply the same set of changes to several forecasts at once:
Select the transactions to be modified.
Click on Mass edit at the top of the screen. In the Modification of transactions window, modify the desired information.
Click on Apply.
In the Modify transactions window, click on Modify to confirm.
Converting currencies
If you are managing bank accounts in different currencies, you can convert the amounts of the table into one currency.
Click to enlarge
Add the Currency column to the table (to learn how, consult the "Content manager" section of the Tables help page).
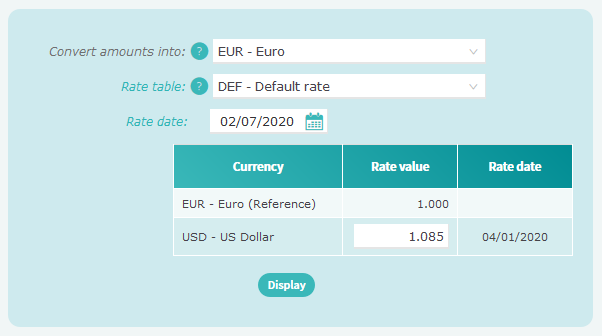
Click on Currency conversion:
Select the currency into which to convert the amounts.
Select a rate table.
In Rate date, enter the current date.
In the table, leave the rate value or enter a new one in relation to the reference currency.
Click on Display.
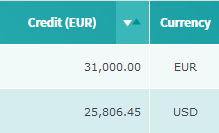
The table now displays the amounts only in the currency you selected (in our example, the amount in USD has been converted into euros):
Splitting forecast transactions
This function is useful when you have agreed with a creditor or a debtor to spread payments over a specific period of time. You can split a transaction into several transactions:
Once you have created a transaction and clicked on Save and split.
Once you have displayed a transaction and clicked on Split.
You cannot split transactions that are linked to a recurring transaction. The action of splitting a transaction cannot be reversed.
Click to enlarge
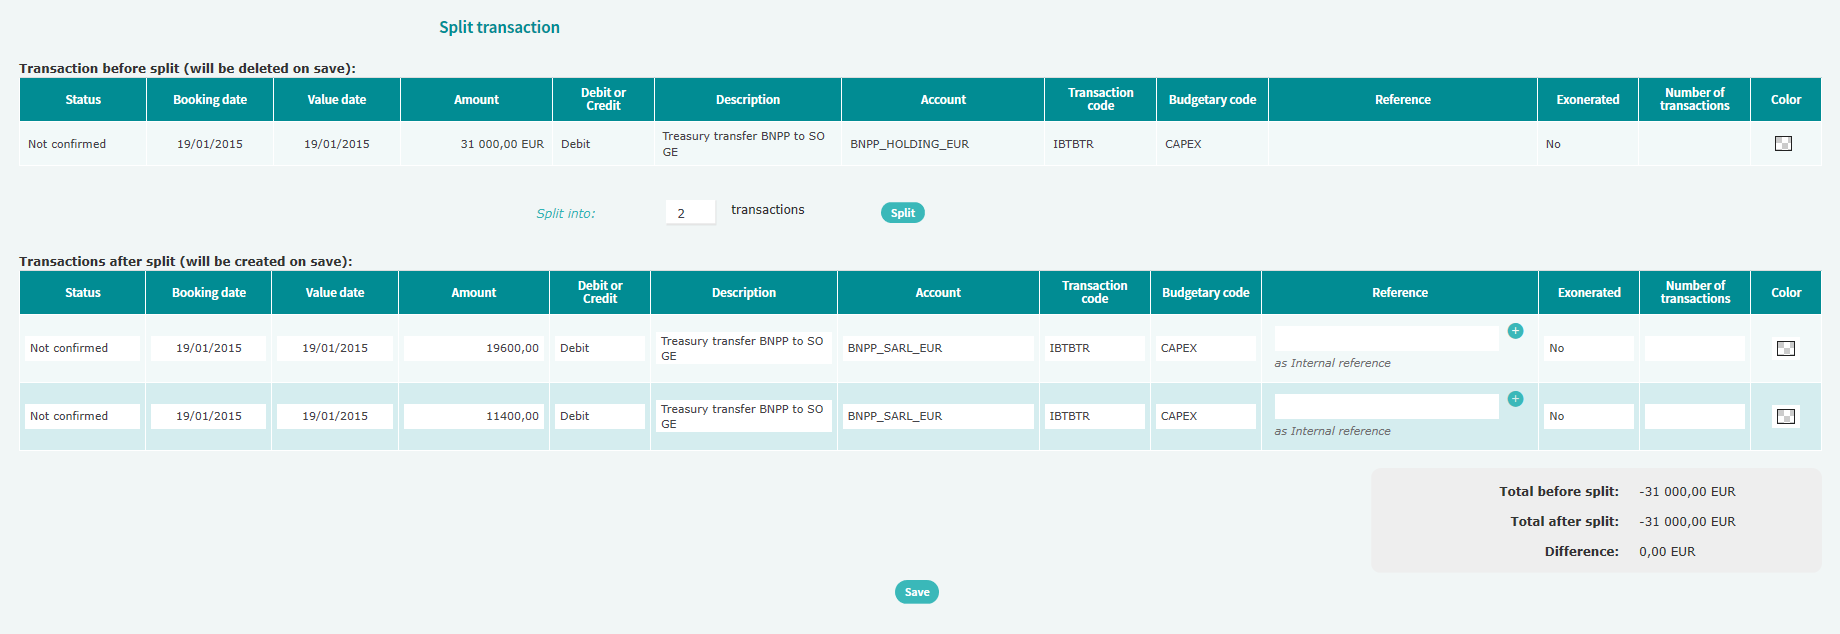
In the Split into field, enter the planned number of transactions and click on Split.
If you are sure the payments will actually occur, select the Confirmed value in the Status column for every transaction.
Select the booking date and value date of every transaction.
Enter the amounts of each transaction.
You can check in the grey box under the table that there is no difference between the total amount before the split and the total amount after the split.
Click on Save.
In the window, click on Split to confirm.
Deleting forecast transactions
Using the Select column of the table, you can delete several transactions in just one action.
This action cannot be reversed. Note that you can only delete transactions that have not been realized yet.
In the Select column, tick the transactions to delete.
Click the bin icon (above or below the table).
In the window, click on Delete to confirm the deletion.